 SCREEN

📌 Quick Summary: A touch screen test is not just for phones. I use the same browser-based grid test to check tablets, Chromebooks, and even touch-screen laptops. You slide your finger across a grid of squares. If a square does not light up, you have found a dead zone. This guide gives you the exact test sequence I use in my workshop, the device-specific quirks, and the truth about what a failed square actually means.
The Chromebook That Failed the Test (And Why It Mattered)
I remember a school IT coordinator bringing me a cart of 30 Chromebooks. They were refurbished units, sold as "Grade A." The seller swore every screen was perfect. She had tested them by opening a white webpage and looking for cracks.
She missed the most important test.
I opened a touch grid on the first Chromebook and dragged my finger across the screen. Three squares in the bottom-right corner stayed blank. No matter how many times I touched them, they refused to register. The seller had never tested touch input. They had only tested the display. That single test saved the school from buying a batch of devices with failing digitizers.
That is why I built the Screen Medic touch screen test. It is not a complicated tool. It is a grid. You slide your finger across it. The squares light up. The ones that stay dark are the problem.
But here is what I have learned after testing thousands of touch screens: the test itself is simple. The interpretation is not. A dead square could mean a cracked digitizer, a loose cable, a screen protector trapping air, or a case pressing on the bezel. This guide walks you through the exact sequence I use to find out which one it is.

The grid test reveals dead zones that a white screen test will never show.
Why a Touch Screen Test Is Different From a Display Test
Most people assume that if the screen looks fine, the touch screen is fine. That is not true. Your device has two separate layers: the display (the pixels you see) and the digitizer (the touch-sensitive layer on top).
The display can be perfect while the digitizer is failing. A dead pixel test will find a black dot on a white screen. A touch screen test will find a region that does not respond to your finger. They are different defects, and they require different tests [citation:4].
This is why I recommend running both tests on any device you are buying, selling, or troubleshooting. If you want the display test, read my guide on Dead Pixel vs Stuck Pixel. If you want the touch test, keep reading.
The Pre-Test Checklist (Do This First)
Before you open the grid, do these three things. If you skip them, you will get false results. I see this mistake every week.
1. Clean the Screen and Remove the Case
Dirt, moisture, and fingerprints can block touch input. A poorly fitted case or a screen protector with trapped air can create a dead zone that does not actually exist [citation:5]. Remove the case. Remove the screen protector if you can. Wipe the screen with a microfiber cloth.
2. Turn Off Any Accessibility Features
If your device only responds to two-finger swipes or double taps, TalkBack or VoiceOver might be active. These accessibility features change how touch input is interpreted. Disable them before testing [citation:5].
3. Set Brightness to Maximum
The grid needs to be visible. A dim screen makes it harder to see which squares have lit up. Set brightness to 100% before you begin.
How to Run the Touch Screen Test (Step by Step)
Open the free Screen Medic diagnostic tool on your device. Select the Touch Screen Test option. The page will fill with a grid of squares.
Here is the exact sequence I use in my workshop:
- Start from the top-left corner. Place your finger firmly on the first square. Do not tap. Slide your finger slowly and continuously across the screen, row by row, like you are painting the grid with your fingertip.
- Watch the squares light up. Every square your finger touches should change color. This is your coverage map. A healthy screen will show a solid block of color when you are done.
- Pay special attention to the edges and corners. This is where digitizers fail first. The sensor grid is least redundant at the edges, and this is also where a device takes impact when it is dropped [citation:7].
- Check for gaps. If a square stays dark after you have passed over it, go back and try again. If it stays dark on the second pass, it is a dead zone.
- Test multi-touch. Switch to the multi-touch mode. Place five fingers on the screen at once. The tool will count how many touch points the device registers. A modern phone should register at least five. A tablet should register ten [citation:4].
If every square lights up and multi-touch works, your touch screen passes. If a square stays dark, you have found a defect.
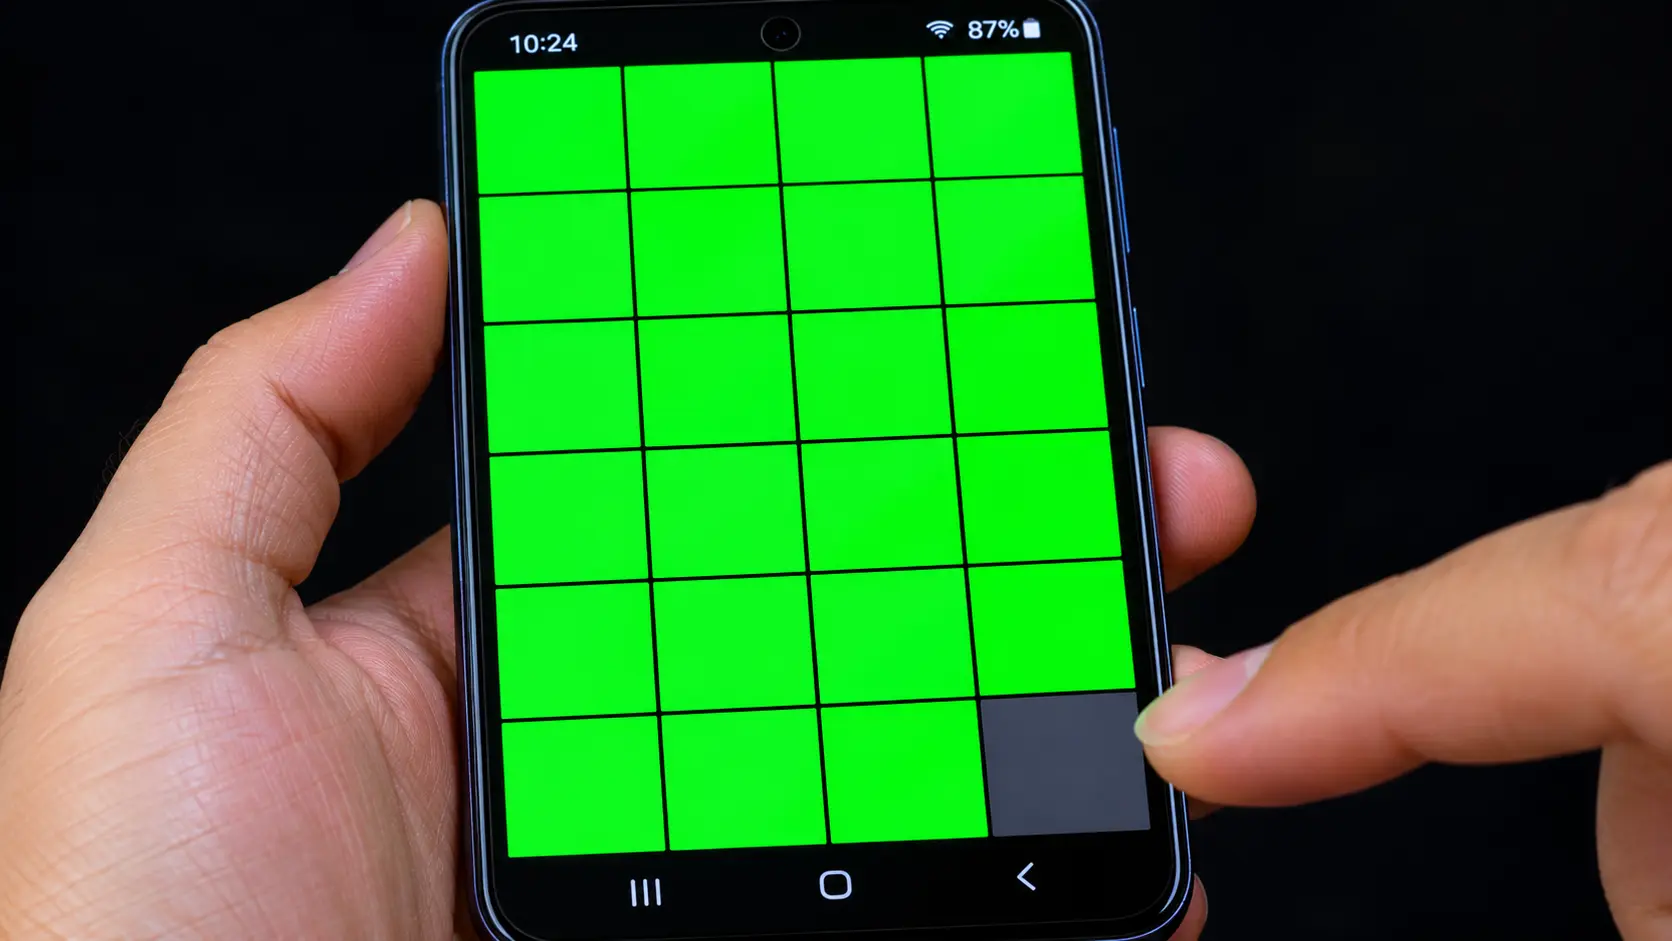
A dead zone in the grid. The square never lights up, no matter how many times you touch it.
What a Dead Zone Actually Means (The Diagnosis)
Not all dead zones are the same. The pattern of the failure tells you what is wrong. Here is how I interpret the results in my workshop.
A Dead Line or Stripe
If the dead zone is a straight line running across the screen, the digitizer has a broken row or column trace. This is usually caused by a cracked digitizer or a manufacturing defect. It is a hardware failure. No software fix will resolve it [citation:4].
A Dead Patch or Corner
If the dead zone is a localized patch, especially near a corner or edge, the cause is often a loose or corroded flex connector. This can happen after a drop or water exposure. A repair shop can sometimes reseat the connector, but often the screen assembly needs to be replaced [citation:4].
Ghost Touches
If the screen registers touches that you did not make, that is a different problem. Ghost touches are often caused by a faulty charger, a damaged screen protector, or a failing digitizer. Unplug the charger and test again. If the ghost touches stop, the charger was the culprit [citation:10].
Offset Touches
If the dot appears slightly away from where you actually touched, that is a calibration issue, not a dead zone. Some devices have a touch calibration routine in the settings. If yours does not, a restart or a software update may help [citation:7].
Device-Specific Quirks (What I Do Differently)
The grid test works on every device with a browser. But the way you run it changes slightly depending on what you are testing.
iPhone and iPad
Apple does not provide a built-in touch grid diagnostic for consumers. The browser test is the most reliable option. Use a finger for the main coverage pass. If you use an Apple Pencil, test it separately. If the browser test passes but taps fail in specific apps, check the Touch Accommodations settings in Accessibility [citation:1].
Android Phones and Tablets
Samsung devices have a built-in Touch Screen diagnostic in the Samsung Members app. Google Pixel devices have a Touch diagnostics option under Display & touch on newer models [citation:1]. You can use these as a second opinion, but the browser grid is faster and works on every Android device regardless of brand.
Chromebooks
This is the device most people forget to test. Schools and institutions issue thousands of Chromebooks, and not all of them have a built-in touch diagnostic. The browser test is the fastest way to check a batch of devices. Run the grid, check the edges, and move on to the next one. It takes under a minute per device.
Touch-Screen Laptops
A touch-screen laptop is essentially a large tablet with a keyboard. The grid test works exactly the same way. The one thing to watch for is the trackpad. Make sure you are touching the screen, not the trackpad, when you run the test.

Testing a Chromebook. The browser grid is the fastest way to check a batch of school devices.
What a Failed Touch Screen Test Does Not Mean
I want to be honest with you, because this is where most guides mislead people. A failed touch screen test does not automatically mean your device is broken. It does not prove that the digitizer is failing. It does not guarantee a warranty replacement.
What it does is this: it shows you that the browser did not receive touch input in a specific area. That is a starting point for diagnosis, not a final verdict [citation:1].
Before you conclude that the hardware is dead, try these three things:
- Remove the screen protector. A lifted protector or trapped air can block touch input. Test again without it [citation:5].
- Restart the device. A temporary software glitch can cause touch failures. A restart clears the memory and reloads the drivers [citation:2].
- Test in safe mode (Android). If the dead zone disappears in safe mode, a third-party app is the culprit, not the hardware [citation:2].
If the dead zone persists after all three, then you are likely dealing with a hardware issue.
Why I Built a Browser-Based Touch Test
I built Screen Medic because I was tired of seeing people get ripped off. I was tired of hearing the same story: "I bought a used tablet and the touch screen stopped working a week later." The seller knew. The buyer did not test.
Most devices do not have a built-in touch grid. Samsung has one. Google has one on some models. But a Chromebook does not. A generic Android tablet does not. A used phone from a marketplace seller does not come with a diagnostic app pre-installed.
The browser is the only universal diagnostic platform. Every device has one. Every device can run a grid. And the test takes under a minute.
If you want to check the display as well, the same tool includes a dead pixel test. For a complete guide to that test, read my article on How to Test Your Monitor Like a Pro.
Frequently Asked Questions (FAQ)
Is this touch screen test really free?
Yes. The Screen Medic tool is completely free. There are no hidden fees, no premium tiers, and no account required. You open the page, run the test, and close it. Nothing is saved or uploaded.
Does it work on iPhone and iPad?
Yes. The test runs in Safari on iOS. If the full-screen mode does not activate automatically, tap the full-screen button in the tool. The grid will fill the screen, and you can slide your finger across it [citation:7].
What is a dead zone?
A dead zone is an area of the touch screen that does not register input. When you slide your finger over it, nothing happens. In the grid test, a dead zone is a square that stays dark even after you have touched it multiple times [citation:4].
Can I fix a dead zone myself?
It depends on the cause. If the cause is a screen protector or a case, yes. Remove the accessory and test again. If the cause is a loose connector or a cracked digitizer, no. That requires a repair shop [citation:4].
What is multi-touch, and why does it matter?
Multi-touch is the ability of the screen to register more than one finger at the same time. A phone should register at least five touches. A tablet should register ten. If your device only registers two or three, pinch-to-zoom and games will not work correctly [citation:4].
Why does my screen register touches when I am not touching it?
That is called a ghost touch. It is often caused by a faulty charger, a damaged screen protector, or a failing digitizer. Unplug the charger and test again. If the ghost touches stop, the charger was the problem [citation:10].
Does the test work on a Chromebook?
Yes. Chromebooks have a browser. The grid test runs in the browser. This is especially useful for schools and IT departments that need to check a batch of devices quickly [citation:13].
Final Thoughts: One Minute of Testing Saves Hours of Frustration
You do not need a special app. You do not need to send your device to a repair shop. You need one minute and a browser.
Slide your finger across the grid. Watch the squares light up. If one stays dark, you have found a problem before it becomes a bigger one. If every square lights up, you have peace of mind.
That is the entire philosophy behind Screen Medic. Free, private, browser-based diagnostics for everyone.
🔍 Run the Free Touch Screen Test Now
Related Guides
- Dead Pixel vs Stuck Pixel: What's the Difference?
- What is a Dead Pixel? The Complete 2027 Guide
- How to Test Your Monitor Like a Pro: 5 Essential Checks
- How to Test a Used Monitor Before Buying
- Screen Tests for Every Device: A Technician's Complete Guide
- iPhone Screen Test: The Founder's Guide to Spotting Defects
- iPhone Screen Test: The Complete Visual Guide
- iPhone Screen Test: The Technician's Guide to Hidden Defects
- Samsung Galaxy S25 Ultra Screen Test: The Hidden Defects
- Galaxy Z Fold 8 Screen Test: How to Spot Hidden Defects
- Just Got Your New iPhone? Do This 30 Second Test First
💬 Leave a Comment
Have a question or something to add? Share your thoughts below.
Loading comments...